- cv2的基本函數
import cv2
cv2.imread()
cv2.IMREAD_GRAYSCALE()
cv2.imshow()
cv2.waitKey(0);
cv2.destroyAllWindows()
cv2.destroyWindow()
cv2.imwrite()
#-----在pythonanywhere上無法使用cv2.imshow
# cv01.py
import numpy as np
import cv2
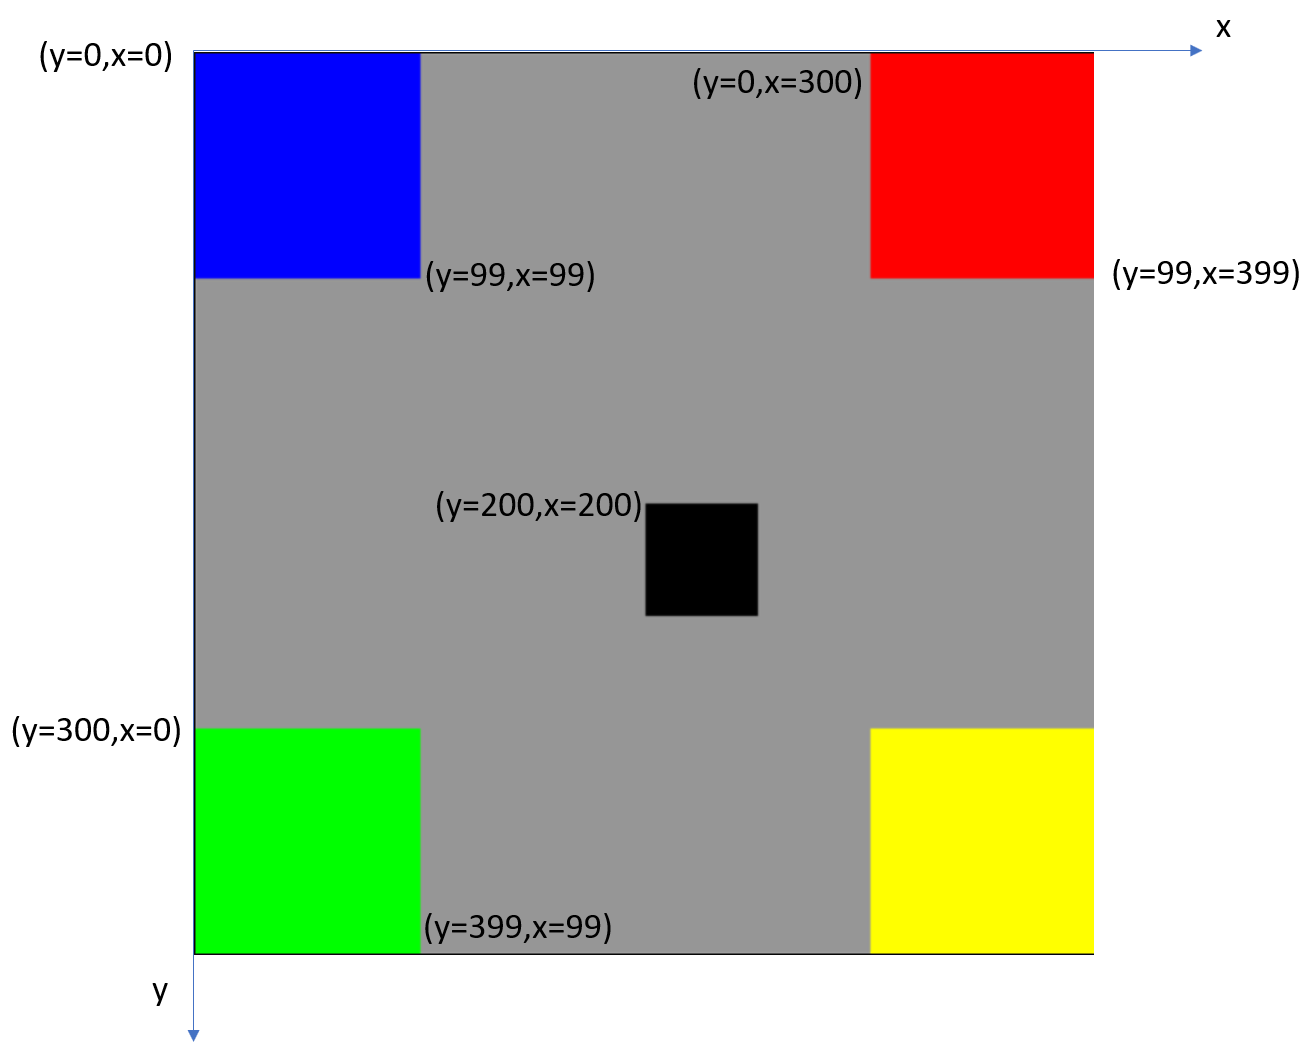
Lx=400; Ly=400
img=np.full((Ly,Lx,3),150,dtype=np.uint8) #灰色400x400的正方形
img[0:100,0:100,:]=[255,0,0] #左上角的100x100藍色正方形
img[Ly-100:Ly,0:100,:]=[0,255,0] #左下角的綠色正方形
img[0:100,Ly-100:Ly,:]=[0,0,255] #右上角的紅色正方形
img[Ly-100:Ly,Ly-100:Ly,:]=[0,255,255] #右下角的黃色正方形
img[200:250,200:250,:]=[0,0,0] #中央的黑色正方形
cv2.imwrite('square_01.png',img)
#---- for jupyter------------------------------
cv2.imshow('img',img)
if cv2.waitKey(3000) & 0xFF == ord('q'): pass
cv2.destroyAllWindows()
print('cv01 is done')
|
|
# cv02.py
import numpy as np
import cv2
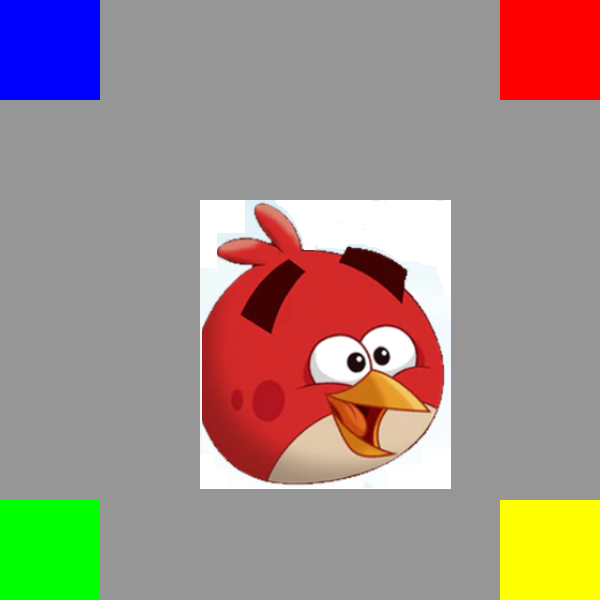
Lx=600; Ly=600
ab=cv2.imread('AngBd.png')
print('ab.shape=',ab.shape)
aby=ab.shape[0]; abx=ab.shape[1]
img=np.full((Ly,Lx,3),150,dtype=np.uint8) #灰色400x400的正方形
img[0:100,0:100,:]=[255,0,0] #左上角的藍色正方形
img[Ly-100:Ly,0:100,:]=[0,255,0] #左下角的綠色正方形
img[0:100,Ly-100:Ly,:]=[0,0,255] #右上角的紅色正方形
img[Ly-100:Ly,Ly-100:Ly,:]=[0,255,255] #右下角的黃色正方形
img[200:250,200:250,:]=[0,0,0] #中央的黑色正方形
img[200:200+aby,200:200+abx,:]=ab #在灰色正方形的中央插入
#憤怒鳥的圖片
cv2.imwrite('ab_01.png',img)
#---- for jupyter------------------------------
cv2.imshow('img',img)
if cv2.waitKey(3000) & 0xFF == ord('q'): pass
cv2.destroyAllWindows()
print('cv02 is done')
|

|
|
# cv03.py
import numpy as np
import cv2
img = cv2.imread('AngBd.png')
(Ly,Lx)=(img.shape[0],img.shape[1])
F=2
Lx2=int(Lx/F); Ly2=int(Ly/F)
img2=np.full((Lx2,Ly2,3),0,dtype=np.uint8)
print('Lx=',Lx,'  Ly=',Ly,'  Lx2=',Lx2,'  Ly2=',Ly2)
for i in range(0,Lx2):
    for j in range(0,Ly2):
        x=int(i*F); y=int(j*F) #x,y是i,j的F倍
        for k in range(3):
            img2[i][j][k]=img[x][y][k]  #只使用原圖FxF的中一個
                                         像素來作為XY點的像素
print('img.shape=',img.shape)
print('img2.shape=',img2.shape)
cv2.imwrite('ab_02.png', img2)
#---- for jupyter------------------------------
cv2.imshow('My Image 1', img)
cv2.imshow('My Image 2', img2)
if cv2.waitKey(3000) & 0xFF == ord('q'): pass
cv2.destroyAllWindows()
print('cv03 is done')
|
# cv04.py
import numpy as np
import cv2
img = cv2.imread('AngBd.png')
(Ly,Lx)=(img.shape[0],img.shape[1])
F=2
Lx2=int(Lx/F); Ly2=int(Ly/F)
img2=cv2.resize(img,(Lx2,Ly2))   #cv2內建resize函數
cv2.imwrite('ab_02.png', img2)
img_gray = cv2.imread('AngBd.png', cv2.IMREAD_GRAYSCALE)
img2_gray=cv2.cvtColor(img2, cv2.COLOR_BGR2GRAY)
cv2.imwrite('ab_03.png', img_gray)
cv2.imwrite('ab_04.png', img2_gray)
#---- for jupyter------------------------------
cv2.imshow('My Image 1', img)
cv2.imshow('My Image 2', img2)
if cv2.waitKey(3000) & 0xFF == ord('q'): pass
cv2.destroyAllWindows()
print('cv04 is done')
|
|
|
  
|
import numpy as np
import cv2
# 讀取圖檔
img = cv2.imread('rect-3.png')
print('type=',type(img))
print('shape=',img.shape,'   ndim=',np.ndim(img))
img_gray = cv2.imread('rect-3.png', cv2.IMREAD_GRAYSCALE)
print('type=',type(img_gray))
print('shape=',img_gray.shape,'   ndim=',np.ndim(img_gray))
# 顯示圖片
cv2.imshow('My Image 1', img)
# 按下任意鍵則關閉所有視窗
cv2.waitKey(0)
cv2.destroyAllWindows()

cv2.imshow('My Image 2', img)
cv2.imshow('My Image 3', img_gray)
cv2.waitKey(0)
cv2.destroyAllWindows()

cv2.imshow('My Image 2', img)
cv2.imshow('My Image 3', img_gray)
cv2.waitKey(0)
# 關閉 'My Image 2' 視窗
cv2.destroyWindow('My Image 2')

cv2.waitKey(0)
cv2.destroyWindow('My Image 3')

# 寫入圖檔
cv2.imwrite('rect-3gray.png', img_gray)
|
type=
shape= (260, 298, 3)    ndim= 3
type=
shape= (260, 298)    ndim= 2

|
open cv and numpy
import numpy as np
import cv2
img = cv2.imread('rect-3.png')
(Ly,Lx)=(img.shape[0],img.shape[1])
F=2
Lx2=int(Lx/F); Ly2=int(Ly/F)
img2=np.full((Ly2,Lx2,3),0,dtype=np.uint8)
print('Ly=',Ly,'  Lx=',Lx,'  Ly2=',Ly2,'  Lx2=',Lx2)
for j in range(0,Ly2):
    for i in range(0,Lx2):
        y=j*F; x=i*F;
        img2[j,i,:]=img[y,x,:]
print(img.shape)
print(img2.shape)
cv2.imwrite('rect-3A.png', img2)

img2=np.copy(img)
for i in range(0,Lx2):
    for j in range(0,Ly2):
        img2[i,j,:]=[0,255,0]
cv2.imwrite('rect-3B.png', img2)

img2=np.copy(img)
img2[Ly2-4:Ly2+4,0:Lx,:]=[0,0,0]
cv2.imwrite('rect-3C.png', img2)
- 圖片的縮圖與陣列的關係
圖片是以像素的形式呈現而像素的資訊由陣列所儲存的數據所決定。將圖片縮圖等同於將一個比較多的資訊的大的陣列指,指按照比例保留部分的陣列數據,因此縮圖與陣列之間是有對應關係的。
import numpy as np
import cv2
img = cv2.imread('rect-3.png')
(Lx,Ly)=(img.shape[0],img.shape[1])
F=4
Lx2=int(Lx/F); Ly2=int(Ly/F)
img2=np.full((Lx2,Ly2,3),0,dtype=np.uint8)
print('Lx=',Lx,'  Ly=',Ly,'  Lx2=',Lx2,'  Ly2=',Ly2)
for i in range(0,Lx2):
    for j in range(0,Ly2):
        x=i*F; y=j*F
        for k in range(3):
            img2[i][j][k]=img[x][y][k]

print(img.shape)
print(img2.shape)
cv2.imwrite('rect-3F4.png', img2)
cv2.imshow('My Image 1', img)
cv2.imshow('My Image 2', img2)
cv2.waitKey(0)
cv2.destroyAllWindows()
|
Lx= 260   Ly= 298   Lx2= 65   Ly2= 74
(260, 298, 3)
(65, 74, 3)

|
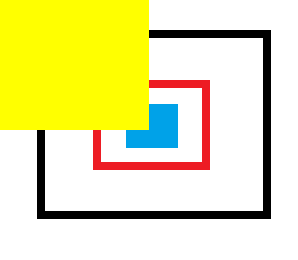
- 直接取代陣列的數值進而可以有目的地改變圖片
用雙重迴圈直接將陣列的數值,以黃色所對應的數值取代(B,G,R)=(0.255,255),就可將圖片某個區塊的顏色完全取代為黃色,達到遮蔽的效應。
import numpy as np
import cv2
img = cv2.imread('rect-3.png')
(Lx,Ly)=(img.shape[0],img.shape[1])
F=2
Lx2=int(Lx/F); Ly2=int(Ly/F)
img2=np.copy(img)
print('Lx=',Lx,'  Ly=',Ly,'  Lx2=',Lx2,'  Ly2=',Ly2)
for i in range(0,Lx2):
    for j in range(0,Ly2):
        for k in range(3):
            img2[i][j][0]=0;img2[i][j][1]=255;img2[i][j][2]=255;
print(img.shape)
print(img2.shape)
cv2.imwrite('rect-3block_1.png', img2)
cv2.imshow('My Image 1', img)
cv2.imshow('My Image 2', img2)
cv2.waitKey(0)
cv2.destroyAllWindows()
|
Lx= 260   Ly= 298   Lx2= 130   Ly2= 149
(260, 298, 3)
(260, 298, 3)
|
- 列印陣列的數值
列印陣列的數值內容以便驗證與圖形的對應關係。
import numpy as np
import cv2
img = cv2.imread('rect-3F4.png')
(Lx,Ly)=(img.shape[0],img.shape[1])
Lx2=int(Lx/2)
print('Lx=',Lx,'  Ly=',Ly)
for i in range(Lx2,Lx2+1):
    for j in range(0,Ly):
        if(j < int(Ly/2)):
            print(i,j,img[i,j,0],img[i,j,1],img[i,j,2])
        for k in range(3):
            img[i][j][0]=0;img[i][j][1]=0;img[i][j][2]=255;
print(img.shape)
cv2.imwrite('rect-3VL.png', img)
cv2.imshow('My Image 1', img)
cv2.waitKey(0)
cv2.destroyAllWindows()
|
Lx= 65   Ly= 74
32 0 255 255 255
32 1 255 255 255
32 2 255 255 255
32 3 255 255 255
32 4 255 255 255    白色
32 5 255 255 255
32 6 255 255 255
32 7 255 255 255
32 8 255 255 255
32 9 255 255 255
32 10 0 0 0          黑色
32 11 0 0 0
32 12 255 255 255
32 13 255 255 255
32 14 255 255 255
32 15 255 255 255
32 16 255 255 255
32 17 255 255 255
32 18 255 255 255    白色
32 19 255 255 255
32 20 255 255 255
32 21 255 255 255
32 22 255 255 255
32 23 255 255 255
32 24 36 28 237
32 25 36 28 237      紅色
32 26 255 255 255
32 27 255 255 255
32 28 255 255 255    白色
32 29 255 255 255
32 30 255 255 255
32 31 255 255 255
32 32 232 162 0
32 33 232 162 0
32 34 232 162 0    藍色
32 35 232 162 0
32 36 232 162 0
(65, 74, 3)
|

|
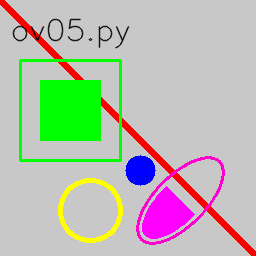
- openCV的畫圖函數-範例
import numpy as np
import cv2
img = np.zeros((256, 256, 3), np.uint8)
img.fill(200)
# 在圖片上畫一條紅色的對角線,寬度為 5 px
# cv2.line(影像, 開始座標, 結束座標, 顏色, 線條寬度)
cv2.line(img, (0, 0), (255, 255), (0, 0, 255), 5)
#cv2.rectangle(影像, 頂點座標, 對向頂點座標, 顏色, 線條寬度)
cv2.rectangle(img, (20, 60), (120, 160), (0, 255, 0), 2)
#cv2.circle(影像, 圓心座標, 半徑, 顏色, 線條寬度)
cv2.circle(img,(90, 210), 30, (0, 255, 255), 3)
cv2.circle(img,(140, 170), 15, (255, 0, 0), -1)
cv2.ellipse(img, (180, 200), (25, 55), 45, 0, 360, (205, 0, 255), 2)
cv2.ellipse(img, (180, 200), (20, 50), 45, 0, 180, (255, 0, 255), -1)
cv2.putText(img, 'ov05.py', (10, 40), cv2.FONT_HERSHEY_SIMPLEX,
 1, (0, 0, 0), 1, cv2.LINE_AA)
cv2.waitKey(0)
cv2.destroyAllWindows()
|
|